835 Files
How to resolve import batch errors
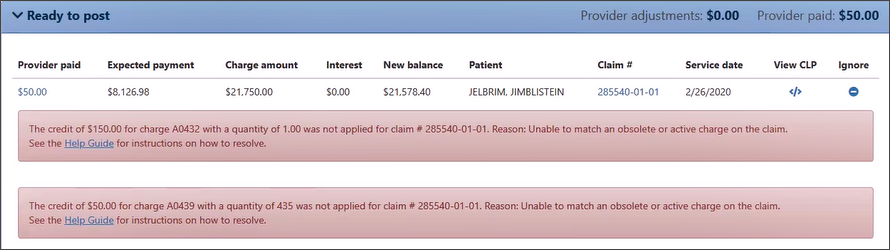
When importing a bulk remittance file, there could be times when one or more payments fail to import. In this case, an error message displays on the Transaction Summary page that shows the credit amount, HCPC, claim number and the issue.
(click figure to enlarge)
Use the following steps to resolve the issue(s):
-
Scroll down from the error messages to review the list of imported claims and locate the claim number(s) shown in the error message(s). For claims with an error, there most likely will be one or more charges that did import correctly for that claim.
-
On the line associated with that claim, click the blue ignore button to ignore the claim number from the list.
Complete this step for each claim number in the remit for which you received an error message.
-
Once you have all the offending claims out of the batch, the unallocated amount should be 0.00 and you will be able to post the batch.
-
Now, create one or more separate manual transactions to post the claims you ignored in step 2.
-
Be sure and use the same transaction details such as the transaction number, deposit date, etc.
The transaction amount will be the total payment(s) for all ignored claim(s).
-
For each claim you ignored in the 835 batch, create a new line item.
-
When you are done, post the batch.
How to import an 835 file
- Go to Waystar and download the 835 file to your desktop.
- On the Billing navigation bar, click Payments and then Payments again.
- Click Import a transaction and enter a deposit date. After the import completes, you will see the results on the Transaction Summary page.
There are three possible outcomes for every claim in the remit file:
Ignored: Claims that do not exist in your company but were on the remit. The claim amount for these claims is ignored. You may see this section if you are migrating from another billing system to ZOLL Billing.
Reviewed required: Claims that exist in your company but the transaction payer or crossover payer does not exist on the patient's account. To fix, click Resolve to associate the payer to that account. Once the payer is associated, the claim moves to the "Allocated" section. If the payer does not exist in the system, go to Admin > Billing > Insurance and add the payer and then return to the Transaction Summary page to associate the new payer with the patient account.
Ready to post: Shows all the claims that have an identified payer as well as claims that were previously in the Unallocated section that you fixed. Denials will display in this section with a zero payment.
After you fix the claims in the "Reviewed required" section, and all claims are in the "Ready to post" section, then the "Post transaction" button will enable. Click Post transaction to post the remit.
- Go to Waystar.com and scroll down to the very bottom of the page.
- Click Payer list.
- Search by payer and update that information in ZOLL Billing.